Filter Stack (TextMeshPro) Component
Overview
This component allows the TextMeshPro - Text (UI) component to be rendered with multiple filter effects (eg Drop Shadow, Outline etc).
WebGL Demo
Properties
| Property | Type | Range | Default | Description |
|---|---|---|---|---|
| Apply To Sprites | Bool | True | Whether to apply the filters to sprites. | |
| Relative To Transform Scale | Bool | False | Whether to scale the filters relative to the trasnform scale. This only uses the the X component of the transform scale and so is only useful for scale that affects all 3 axes. When this is disabled the size values for filters (eg Size in the blur filter) will be in pixels, but with this enabled the pixel sizes will be scaled too. | |
| Relative Font Size | Float | 0.0 | The font size to use as a refernce when applying scaling to pixel effects relative to the font size. Setting this to zero will disable scaling based on font size. | |
| Update On Transform | Bool | True | When this is disabled any transformation (translation, rotation, scaling) will not cause the filter to re-render. This can improve performance as in many cases re-rendering is not necessary. | |
| Render Space | Enum | Canvas | Which coordinate system use when rendering this filter. Options are: • Canvas: Render the filter before any transforms (scale/rotation/translation etc) are applied.• Screen: Render the filter after transforms have been applied. Read more about this property here. | |
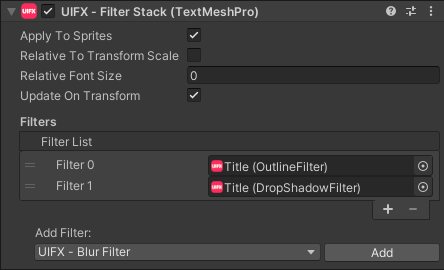
| Filters | List | A list of image filters to apply, all deriving from the FilterBase class. The order can be changed by dragging the filters. |
Setup
To use this component with TextMeshPro you first need to have the support for TextMeshPro enabled:
- Make sure TextMeshPro package is added to your project
- Go to the
Edit > Project Preferenceswindow and open the UIFX options, enabledTextMeshPro Supportand press theApply Changesbutton.
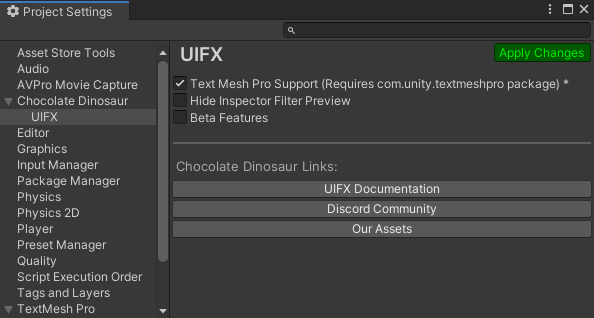
- Wait for the scripts to reload
- Close the Preferences window
Usage
Add this component to any GameObject that contains a UI TextMeshPro - Text (UI) component, then add your filter components (eg Drop Shadow, Outline) and assign them to the Filters list property.
Render Space
The RenderSpace property effectively controls whether the Graphic filter is applied before or after the Transform is applied. There are two options:
Canvas- This is the default mode for all filters. In this mode the filter is rendered to theGraphicbefore it is transformed into screen-space by the localTransformand by theCanvas. This means that any changes or animations to the transform (or it's parents) will not cause the filter to re-render (unlessCanvashas per-pixel mode enabled), which is a performance benefit! This also means that when theGraphicis rotated, the filter will not be aware of this, so the filter will rotate as well. Imagine as drop-shadow effect.Screen- This was the default mode before version 1.8.0 was released. In this mode the filter is rendered to theGraphicafter it is transformed into screne-space. This means that any changes or animations to the transform (or it's parents) will cause the filter to re-render which can become expensive. It has the advantage that it is possible to do some screen-aware options, such as clamping the filter to the edges of the screen, or extending an edge to the edge of the screen (for example in the Frame Filter component)
A summary of the differences:
| Feature | Canvas | Screen |
|---|---|---|
| Adjusting transform causes filter re-render | No (unless Canvas has per-pixel mode enabled) | Yes |
Scripting
Namespace
The namespace
using ChocDino.UIFX;
Adding Filters
Adding filters to FilterStackTextMeshPro
// Adding filters (NOTE: you have to reassign the Filters property)
var filterStack = GetComponent<FilterStackTextMeshPro>();
var filters = filterStack.Filters;
filters.Add(myFilter);
filterStack.Filters = filters;